Matt's Old Cars.com
Fiddling with Rambler's since 1995
Project Charity: AMX
Technical Information
Photo Gallery
Rambler American Restoration
1978 El Camino
1967 Rambler American
2007 Dodge Ram
1984 Dodge Ramcharger
Links
FAQ
Send me an e-mail:
Contact Form
Back to American Restoration Index
Fixing the Leaky Windshield in my `68 American
Part 10 - Assembly Home Stretch
September 30, 2002
Since the last time I wrote, I've finished most of the assembly of the car and a new windshield has been installed. Re-assemble was largely uneventful with the exception that one of the clips that a fender to body bolt goes into broke at some point and I didn't notice it until I went to put the fender on. I did manage to get a replacement clip but I dropped it into the structure of the car so it will remain there until I repair the rocker panel and I'll be able to fish it out.
One quick thing to point out - there are two ways to put the windshield wiper linkage in. The first way is the way that is easier to get the wiper arm pivots in and that is to put the linkage in with the drive link off to the right (passenger side). Unfortunately, this is the wrong way and will result in the wipers only going about half way through their sweep. The second way (which shall now be know as the "right" way) is to put the drive link on the left (driver's) side of the car. Doing it this way results in hard to control floppiness of the driver's side wiper pivot but you can mostly get it into position with a long, thin, flat blade screw driver. On the Cuss-O-Meter™ (scale of 1 - 10, 1 = darn/nuts, 10 = language that would make the Osbournes blush), this job rates at a solid 8. This rating isn't due to the complexity of the job, but to the general floppiness of the part involved and lack of room in which to work.
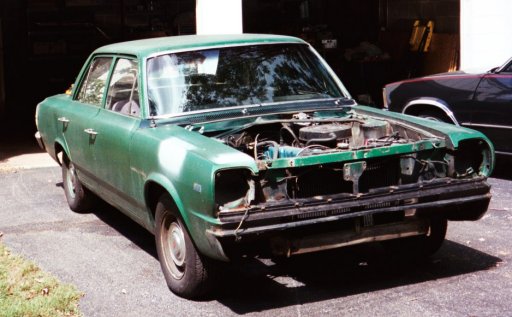
The only parts I have left to install are: grille (the car will finally have a 1968 grille on it!), headliner and dash moldings, kick panels, ash tray (still needs cleaned up and tray pull reinstalled), and glove box. The picture below shows the car before I put the hood and bumper on it.
Between the time the above picture was taken and I went to the car show mentioned below, I also got to deal with a broken brake line and bleeder screw. I've also installed a brand new Holley model 1931 carburetor and that didn't go as smoothly as it should have for two reasons: Firstly, the carburetor was sitting for who knows how long after it was made with a mixture of cutting fluid and metal chips in the metering block which gummed up and caused the power valve (which is an aptly name device) to stick shut -- it took me an hour to clean that up. Secondly, some goo from the gas tank made it's way into the power valve causing it to stick shut intermittently which made the car take off like a rocket, bog down for a few seconds, and take off like a rocket again - it only took 45 minutes to clean up this time. I'm having the gas tank cleaned out soon to fix this problem and I'm also planning on making new hard lines for the vacuum advance, vacuum wiper, and fuel pump to carburetor lines since I have a friend with a car to copy off of..
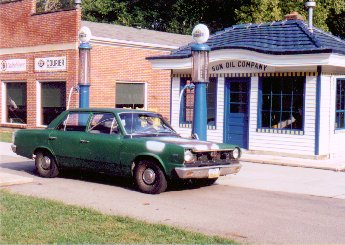
I took the car on it's first meaningful drive on September 28th (Cincinnati, OH to Dayton, OH) and entered it into the 2nd Annual Edmund Anderson Midwest Regional AMCRC Meet. Imagine my surprise when I won an Honorable Mention award! The show was a blast (even without the award) and will be held on the last Saturday of September at Carillon Historical Park (http://www.carillonpark.org) next year. Here's a picture of the car in front of a 1920's era gas station that's at the park:
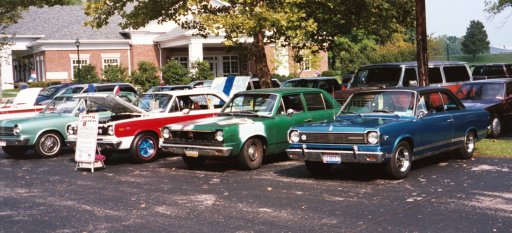
Here's my car between the first (SC/Rambler) and second or third place (1967 Rogue) cars in the 1964-1969 American class.
Last Updated 01/04/04 09:36:03 PM