Matt's Old Cars.com
Fiddling with Rambler's since 1995
Project Charity: AMX
Technical Information
Photo Gallery
Rambler American Restoration
1978 El Camino
1967 Rambler American
2007 Dodge Ram
1984 Dodge Ramcharger
Links
FAQ
Send me an e-mail:
Contact Form
Back to American Restoration Index
Parking Brake Cable R&R
WARNING! Nothing beats a factory level service manual. There are various details that this article doesn't cover that are in your service manual. Also, the brakes are not something to be taken lightly. When in doubt, take your car to a trusted mechanic.
One of the things I had to do on my American when I got it was to replace worn out brake parts. This involved replacing all four wheel cylinders, shoes, springs, self-adjusters, drums, a section of brake line, and the rear parking brake cables. This article will detail how to replace the rear parking brake cables on a 6 cylinder 1968 American. But, before I get started, a few words to the wise...
If you have never done a brake job on drum type brakes, stop now. If you put things back together incorrectly, the brakes will fail and you could cause severe injury or death to yourself and those around you. This is not to say that a brake job is beyond the capability of the average person, you just need to make sure you know what you are doing.
Tools
You'll need the following tools for this job:
- 3/8" nut driver or socket wrench
- A large flat blade screw driver
- needle nose and regular pliers
- drum brake spring removal tools (one for return springs, one for hold-down springs)
- 2 - 1/2" open end wrenches
- jack stands
- floor jack
Supplies
You'll need the following shop supplies:
- hand cleaner
- white (lithium) grease
- shop towels
- 1/16" cotter pins
- 3/32" cotter pins
Before you go to the parts store...
There are a few things you need to check before you head to the parts store. First, put the car up on jack stands and remove the rear wheels. Make sure the parking brake is released and crawl under the car. Find the barking brake equalizer and pull on each cable going to the rear wheels. If both of the cables move, you have some other problem preventing the parking brake from working. The next step is to inspect the actual brake assemblies. There may or may not be 3, 3/8" hex screws holding each drum on the car. If they are there, remove them. Back off the self adjusters and remove the drum. Check the following items: condition of the star wheel on the self-adjuster and the cable that activates it, check the linings on the shoes, and check to make sure the wheel cylinder isn't leaking (some leakage around the seals is normal, if the whole thing is wet, replace the cylinder). If anything needs replaced, now is the time to do it. You will also need 1-1/16" and 3-3/32" cotter pins. Part numbers are listed in Rambler Dan's AMC Parts List.
| Once you have the new parts, compare them with the old parts. There may be some minor differences in the design of the clips, but as long as the outside diameter of the clip grooves and the length is the same, you should not have any trouble. |
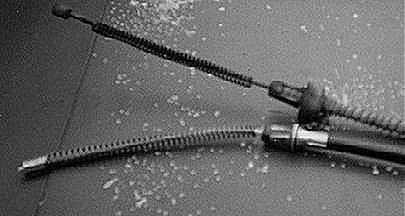 Figure A - Notice the minor differences in cable and clip design. The clip O.D. and length are identical. The cables went in with absolutely no problems. |
Out with the old...
If you took the car off of the jack stands, put it back on them now. The higher in the air, the better. Remove the wheels and drums. Remove the return springs (the ones attached to the anchor above the wheel cylinder). Take a moment to observe how the self-adjusting mechanism is attached, it will likely fall apart in the next few steps. Remove the cable for the self-adjuster and the shoe hold down springs. Pull the shoes apart and remove the parking brake spreader bar and then remove the shoes from the car. Disconnect the brake cable from the parking brake lever attached to the rear brake shoe. If you can't compress the spring on the end of the cable, use a pair of bolt cutters to cut the cable.
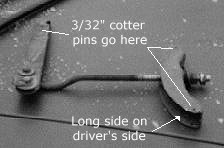
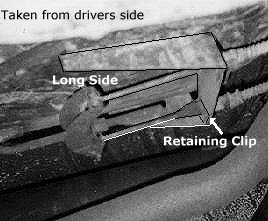 Figure B - This picture shows the assembled equalizer assembly. Note that the long side of the equalizer is on the driver's side of the car. If you install this backwards, the parking brake will not apply correctly. |
Now, get under the car and remove the cotter pin in the brake equalizer that keeps the end of the cable in place. Remove the clip from the bracket holding the cable to the body. Remove the cable from the equalizer. There are 3 tabs on the cable that hold it into the brake backing plate. Use a large screw driver to bend these until they break off. You only need to break one or two of these. The cable just pulls out of the backing plate. |
In with the new...Push the end of the new cable into the hole in the backing plate where the old cable was attached. It should click and be hard to move when it is in all of the way. Attach the cable to the parking brake lever on the shoe. Put a dab of white grease on each of the shoe contact points. STOP! clean your hands and then reassemble the brake. Brakes don't work well with the crud on your hands all over the shoes. The brake should look like Figure E when the brake is assembled. Notice that the long shoe is towards the rear of the car. Also, note the position of the self adjuster mechanism. If you install this backwards, the brakes will self-adjust themselves loose. This is a sure way to cause an accident. Reattach the cable to the bracket near the equalizer. Now, do the cable on the other side. By the way, don't expect your brakes to look this clean. This car had a complete brake job about 20 miles before these pictures were taken. |
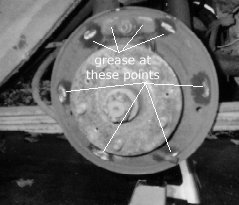 Figure C - Make sure to apply small dabs of white grease where shown. This helps the brakes apply smoothly and retract quickly. |
||
|
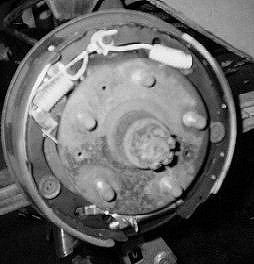 Figure E - This is an assembled passenger side rear brake. Note that the long shoe is towards the rear of the car and that the adjusting wheel of the self-adjuster is also towards the rear. |

The equalizer...Remove the cotter pin that holds the screw rod to the pull bar in the equalizer assembly and remove the screw rod and cable bracket (Pay attention to which way the bracket is oriented. Figure F shows the equalizer correctly assembled.). Replace the cotter pins in the lever pivot and by the front parking brake cable. Take the screw rod (which is what you use to adjust the brakes) and place it in a bench vise. Use a propane torch to heat the nuts for a few minutes. While the nuts are still hot, use a 6 point 1/2" box wrench to break the nuts loose, one at a time. Use a wire brush to remove the rust and scale from the threaded portion of the screw rod and loosen the nuts until they are 3/4" from the end of the rod. Coat the threads with anti-seize. Reassemble the equalizer in the car. Put the ends of the cables in the equalizer and install new cotter pins. |
|
We must all learn to make adjustments...
Make sure the parking brake handle is in the returned position and tighten the nuts on the equalizer until most of the slack is removed. Reinstall the wheels and take the car off of the jack stands. Take the car to an empty parking lot, put the car in reverse and accelerate. When you get up to about 5 MPH (yes, I know that the speedometer doesn't work in reverse, just take your best guess), hit the brakes hard and stay on them until the car has stopped. You will need to do this about 15 or 20 times or until the pedal feels firm and the brakes apply evenly. Don't worry, as long as everything is in good shape, you cannot over adjust the brakes doing this.
Take the car back to your work area and put it back on jack stands. Pull the parking brake lever out three clicks. Get under the car and tighten the adjustment screws on the equalizer until the wheels can't move when rotated forward. Release the brake and check for freedom of movement. Hold the first nut in place and tighten the second up against it (this is called double-nutting). Take the car off of the jack stands and go find a steep hill to check the operation of the brake. With the transmission in neutral (and you in the car), it should not roll. If it does, you will need to tighten the adjusting nuts more.
Last Updated 01/05/04 09:19:12 PM