Matt's Old Cars.com
Fiddling with Rambler's since 1995
Project Charity: AMX
Technical Information
Photo Gallery
Rambler American Restoration
1978 El Camino
1967 Rambler American
2007 Dodge Ram
1984 Dodge Ramcharger
Links
FAQ
Send me an e-mail:
Contact Form
Back to American Restoration Index
Fixing
the Leaky Windshield in my `68 American
Part 1 - Rust, mice, and RTV
September 30, 2001
After attending a car show yesterday (9/29/2001), I was inspired enough to start taking on the leaky windshield on my American, so I cleaned-up the garage enough to get the car back in it and removed the windshield to see what things looked like. Overall, it was pretty much what I excepted (which is a good thing) with only a few surprises.
The first job was removing the sun visors, rear view mirror, and interior moldings from around the windshield (the upper moldings hold the front of the headliner in place on this car). When I removed these moldings, the front of the headliner pretty much disintegrated. This was no surprise since bits of the headliner would fall down while driving. I'm pretty sure that the only thing holding it in place was a combination of spider webs and cigarette tar. The first surprise of the day was a mouse nest between the roof and the headliner located directly above my head.
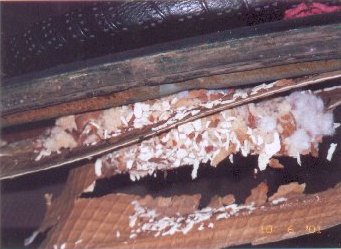
The car had a nice mouse urine odor to it (it was especially pleasant on nice, warm days) that I was having trouble tracking down so I'm pretty sure I found the source (there may be more nests up there since I haven't pulled the rest of the headliner down yet -- I guess I'll find that out soon enough!).
So undeterred (or maybe just to stupid to quit while I'm ahead), I removed the windshield molding. Lucky for me, I only needed to remove the sides and top since I had taken the bottom off a few years ago (it was real loose and I didn't want to lose it). Since I had some practice with my parts car, I was able to pop the moldings off pretty easy except for the side that was RTV'd in place (surprise #2 - the bottom molding was held in place with clear silicon over dirt -- they switched tactics on me and the RTV over spray paint was much more effective). To remove the moldings, I used a door trim removal tool (put it between the gasket and molding and then pump on it -- that is, push the handle towards the windshield and then pull it away -- to wiggle the trim out slowly). This worked very well and I got all of it off without bending anything.
Still feeling lucky (or again, just to stupid to quit), I removed the windshield. Since it was badly delaminated (the area about 3-4 inches in from each side was cloudy) and the last windshield I removed broke upon removing, I had no hope of getting it out in one piece. Needless to say, I wasn't disappointed.
A quick word about windshield removal safety is in order here: Normally, if a windshield breaks on a car with laminated safety glass in it, the chunks will stay attached to the adhesive on the plastic between the sheets of glass (this is like double sided clear tape only it's very flexible). Since this film was losing its ability to hold the sheets of glass together, there were several shards of glass that popped out during removal. This was expected and I had prepared by being very careful, wearing my leather welding gloves (these are thick leather gloves that go about half way up to your elbow) and standing as far off to the side as I could during removal.
Once the glass was out and the broken pieces cleaned up, I removed the windshield molding clips and most of the remaining gasket sealer. Note to anyone installing a windshield: the sealant does not adhere well to spray painted factory sealer and you'll get a much better seal if you put sealant all they way around instead of just at the corners. After I had things cleaned up, I started inspecting the pinch weld.
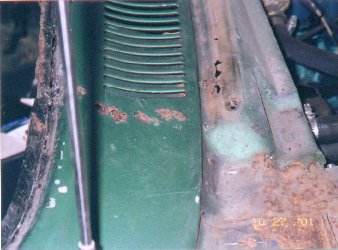
For the most part, the pinch weld is in very good shape. There is an area on the passenger side that needs some rust repair but it appears that it hasn't been bent at all or to have had any prior repairs.
The real unfortunate part about the rust is that I'm going to need to pull the dash to fix it. I could probably leave it in place but I really don't like the smell of burning vinyl and polyurethane and all I need at this point is an interior fire (granted, there's not much of it left, but still...). Also, since I have rust on the front side of the cowl, I want to check the back while I'm at it. The biggest surprise of the day (and also the nicest) was that the TSM was wrong about the number of clips for the windshield molding. The TSM said there are 24 windshield molding clips - 8 each on top and bottom and 4 on each side. My American only has spots for 20 (6 on top, 8 on the bottom, and 3 on each side) which is the exact number that Chrysler had left when I bought them.
If you need these clips, you can get them from:
Restoration Specialties and Supply, Inc.
Box 328, Windber, PA 15963
Voice 814 467-9842
Fax 814 467-5323
The part number for these clips is 2628 and they go for about 50 cents each. You should be aware that there are two different methods of retaining the windshield moldings on Americans. The type I'm talking about is for the molding that does not embed into a slot in the windshield gasket. The other type does not use these clips and is held in place by the windshield gasket.
As far as the rust in concerned, I've found two areas (so far) that need fixed and both are on the passenger side. The first is at the bottom of the pinch weld and is roughly 8 inches long. The area I was able to push through is roughly 1/8" wide (this area was down to bare metal and my guess is the idiot installer scrapped the paint off while "cleaning up" -- and I use that term loosely -- from the original windshield). The second area is about 3 inches long and is where the pan underneath the cowl grille meets the cowl itself.
Last Updated 01/04/04 08:59:50 PM