Matt's Old Cars.com
Fiddling with Rambler's since 1995
Project Charity: AMX
Technical Information
Photo Gallery
Rambler American Restoration
1978 El Camino
1967 Rambler American
2007 Dodge Ram
1984 Dodge Ramcharger
Links
FAQ
Send me an e-mail:
Contact Form
Driver's Side Quarter & Rocker Panels
Part 1 - Prepping The Replacement Quarter Panel
Back to American Restoration Index
April 14, 2003
After the stunning success I had fixing the rust around the windshield, I figured that it's time that I start to repair the driver's side quarter panel and rocker panel. I haven't taken any pictures of actually taking the quarter panel apart (but who really wants to see pictures of me using a drill?) but that job is going well. It's actually been easier than taking the cowl apart with the exception of the areas that are brazed together. I've been able to cut some of these areas apart but I'll need to take a torch to the areas I can't cut apart and carefully un-braze (if that's a word) the seams.
I was planning on completely replacing the quarter panel but I'd have to remove the rain gutter on the rear door and loosen up the roof skin (which means taking the rear window out) to do it right so I'll be replacing from roughly the door striker down. After going this far into the project, I can see why it costs so much to have one of these suckers replaced. The pictures below show about 4-5 hours of work.
Here's how I've progressed so far:
Cut out the spotwelds along the trunk gutter (this is the part the weather strip attaches to) and then realized that doing so was a mistake so no picture :P
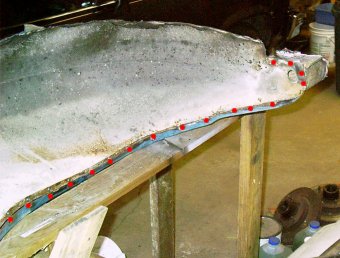
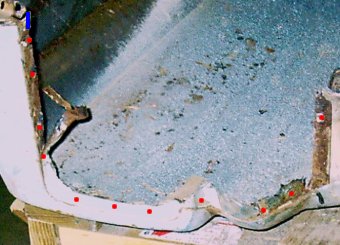
Cut out the spotwelds holding the wheel well to the quarter. Red dots are approximate locations of the spotwelds I cut out.
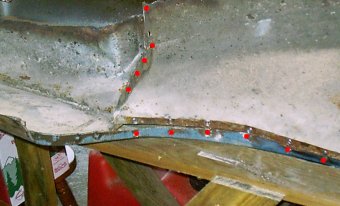
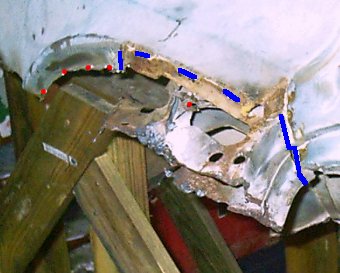
Cut out the spotwelds holding the quarter to the inner side of the door jamb (this is along the pinchweld that's covered by the windlace). Red dots are spotweld locations. Blue lines are where panels are brazed together.
The joint between the pinchweld and the outer rocker panel is brazed. Cutting along this seam did free it from the rocker but it's still attached to an inner panel. I'll have to un-braze it to separate the quarter panel from the internal structure. Brazed areas are shown in blue. Also visible in this picture is the structure of the rocker panel itself. This is actually made up of three panels. The outer is the cosmetic part most people think of when you say "rocker panel". The middle panel is the one looks somewhat reddish brown and has the stamped hole in it. The inner panel appears white in this picture and the floor pan attaches to it.
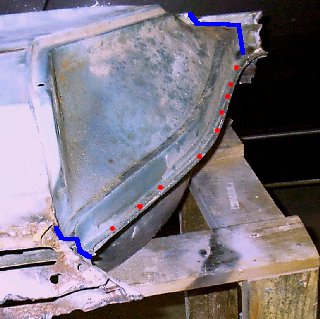
The seam along the top of the quarter where the roof, rain gutter, and quarter come together is brazed. Cutting the brazed seam left me with the same situation as the bottom seam. Also shown in this picture is the location of the spotwelds holding the package tray to the quarter panel. Red dots are spotwelds, blue lines are brazed joints. Note that one of the red dots is under the roof skin and cannot be accessed with it in place. The tab that is spotwelded in that location is perfectly lined up with a hole in the middle panel. I'm guessing that this is a factory alignment mark to make sure the quarter panel is properly located.
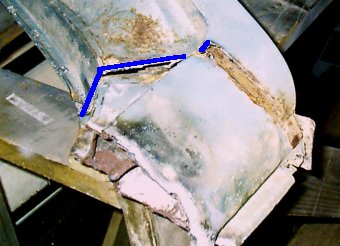
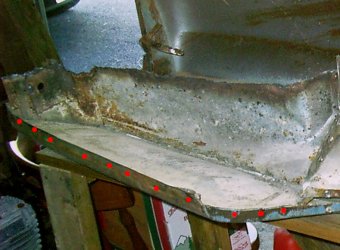
Cut off the bulk of the panel the taillights go in to expose the flange where the spotwelds attach it to the quarter. I'll be using my cut off tool to separate these panels instead of cutting out the spotwelds since this area is awkward to drill in. I would have finished that job but I ran out of cutting wheels :( Once again, red dots are spotweld locations and blue lines are brazed joints.
One area I have not addressed yet is the trunk drop off panel. I was tempted to leave the factory spotwelds in place but after looking at it, I don't have good access to the spotwelds between it and the trunk floor. Leaving it in place will also make it very difficult to fit the section of the quarter panel I'll use as a patch to the car properly. I need to replace the stop on my spotweld cutter before I take care of this.
Up next: Part 2 - I'm a gas welding fool!
Last Updated 02/15/04 04:58:40 PM